It can be hard to keep kids away from screens active during this lock-down. Kids thrive with movement, so one way to encourage your students- or your own children- to move is to create an obstacle course, or a sensory path.
What is a sensory path?
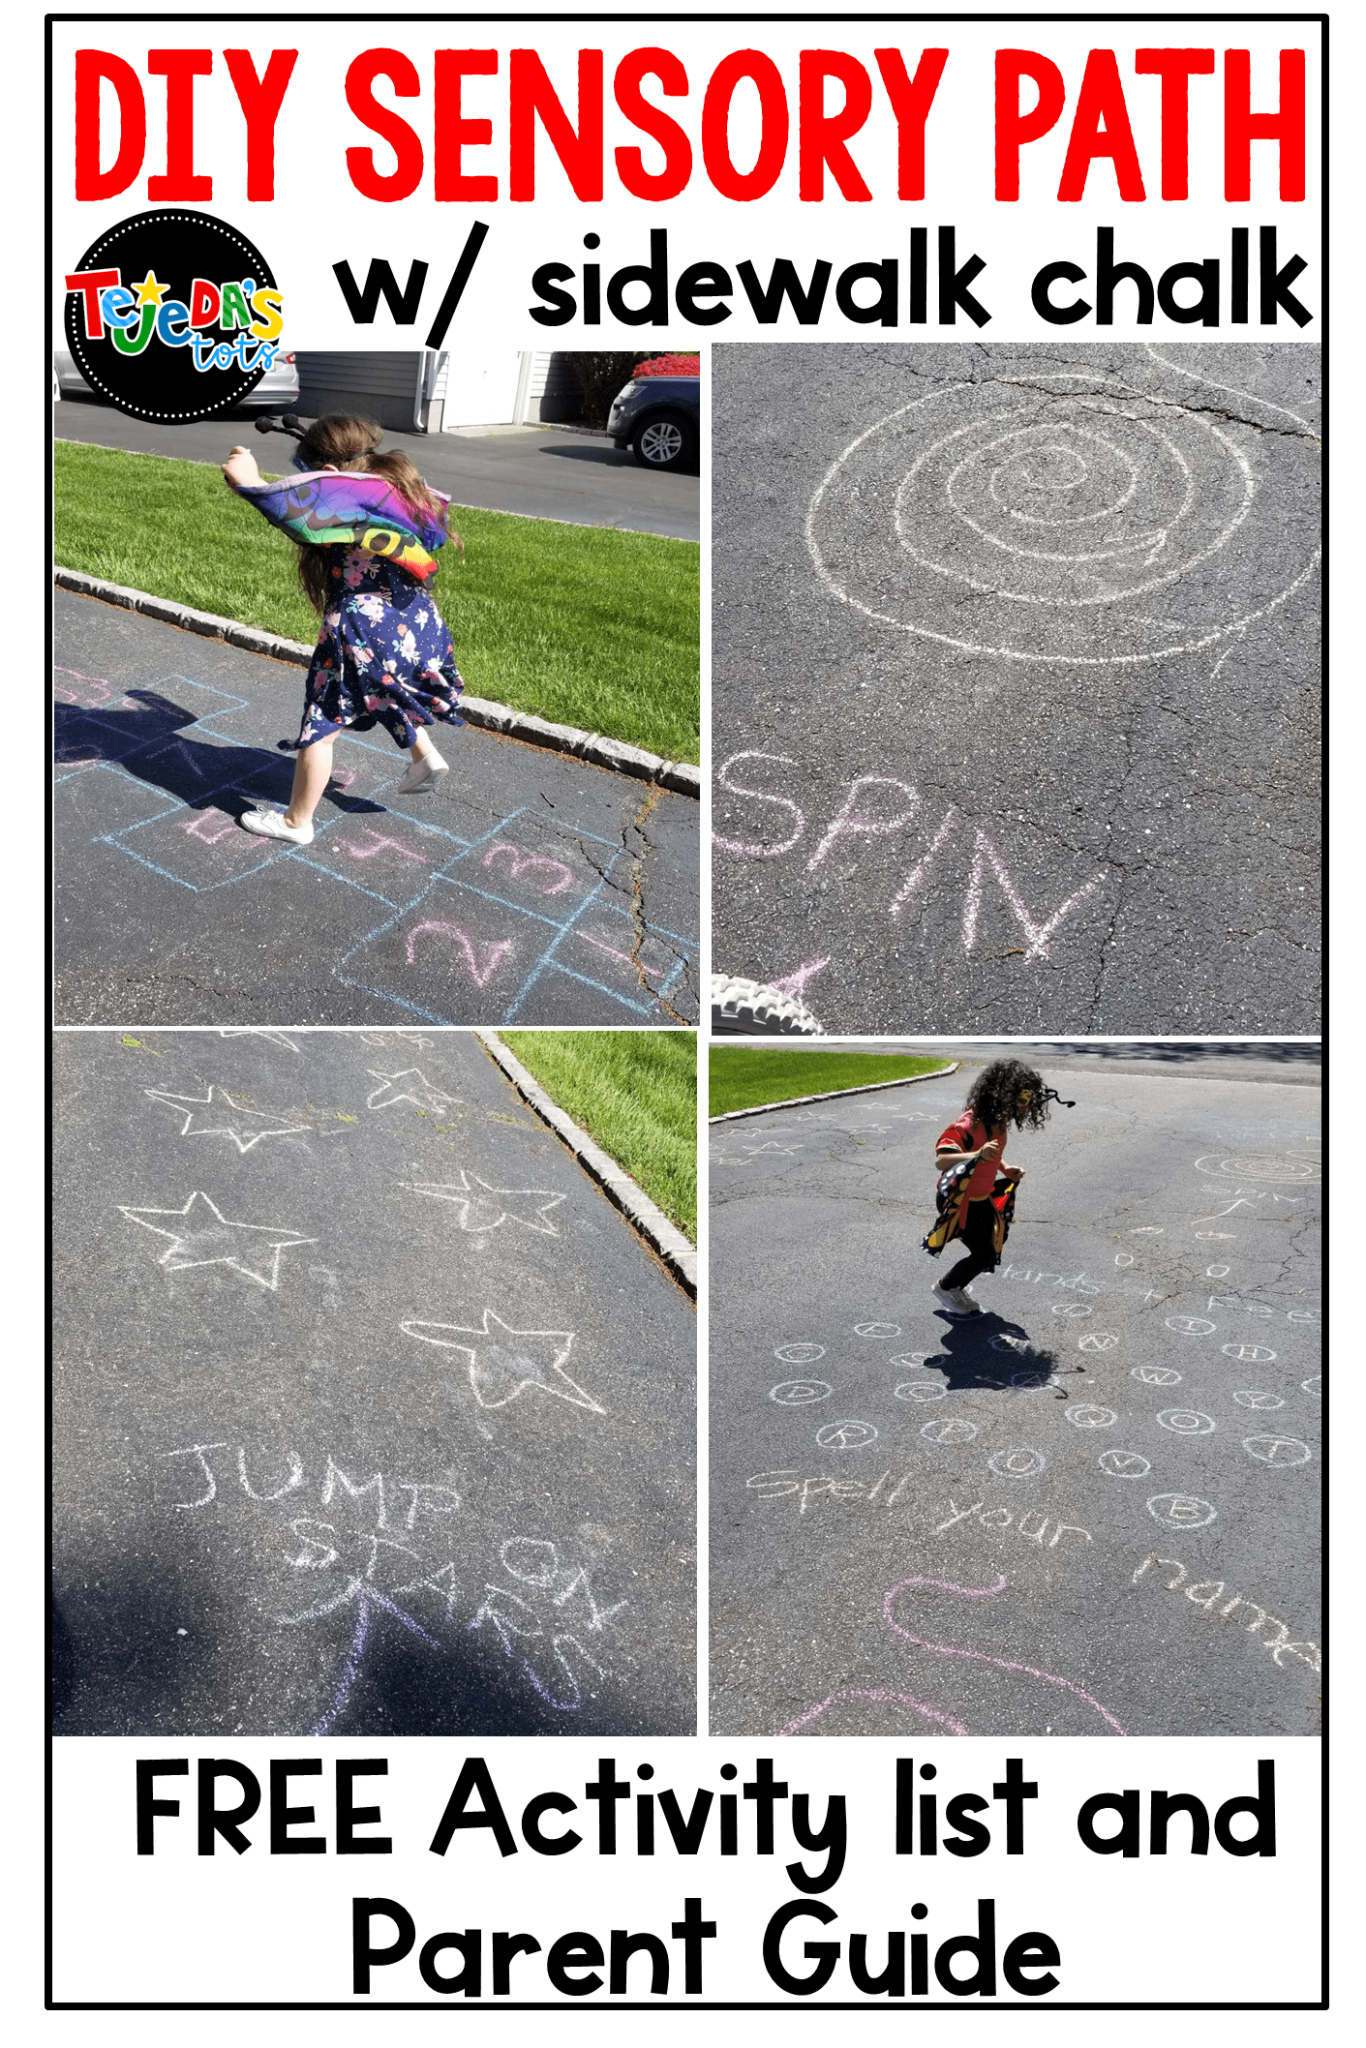
Sensory paths are paths on the floor that have activities for children to interact with as they move along the path. Jumping, spinning, stomping, and clapping are a few of the multitude of activities that can be included in a sensory path. They are a great tool for getting kids moving, playing, and learning while building sensory connections in the brain!
There are tons of benefits of sensory paths, including relieving stress/ coping with emotions, helping with refocusing, physical exercise, coordination, and they’re just FUN!
It’s pretty easy and you can create one with almost any materials you have. Here are some ideas for a sensory path using chalk, but scroll down for alternative ideas as well!
Don’t forget to grab your freebie, an idea sheet for your parents, right here in my free resource library!

Step 1: Planning your sensory path
First, you’re going to need a space of course- a driveway, patio, basketball court, or even a garage.
No space of your own? Is there a nearby parking lot space you can use? After all, it’s just chalk. ?
Next, check the weather! If you plan on using it for more than one day, make sure it’s not going to rain for a few days. Nothing worse than waking up to see your beautiful creation washed away, womp womp. Yes, this happened to us before.
Sketch out your plan before you start drawing. It’ll help you with space and keep you on track to include your favorite activities.
Here are some activity ideas to include:
- Hop/jump- Add a fun twist with numbers to skip-count
- Spin/twirl- draw a twirly circle starting from the middle outward
- Sing/dance- draw a music note or boom box (remember those? If you don’t, it’s ok, just move on)
- Clap while skip-counting, spelling names
- Tip-toe
- Blow bubbles- or pretend, if no real bubbles are available
- Spell name- draw circles with the alphabet
- “Climb”- draw a ladder (or a beanstalk!) and kids “climb” on hands and feet
- Touch shoulders, toes, ears…
- Balance on a “tightrope” (don’t worry, it’s just a line on the ground)
- “Roar and Stomp” on dino footprints
- Hop in and out of tires- OK, I don’t just have extra tires lying around either, but I saw a picture of this that looked pretty cool. ?♀️ Hula hoops work, too. If you had big bamboo earrings in high school, those might work too. ? (Not sure what those are either? Just move along.)
Make it fun! Think of what kids love: spaceships. animals, monsters. Use that to inspire activities for your path. For example, instead of just jumping on circles, draw a spaceship and have them “blast off” onto the planets! Stomping like a dinosaur, hopping like a rabbit, and leaping like a frog onto lily pads add some pizzazz to your path!
Step 2: Drawing Your Sensory path
If possible, use really bright and colorful chalk- at least 4 different colors. I love Crayola chalk; they’re super bright so you won’t have to go over your drawings a gazillion times to show. It does cost more, but if you can, I highly recommend it over a generic brand.
I ended up with a LOT more empty space than I had planned in my sketch because I didn’t actually measure my space and apparently I draw too big. It’s OK if you do, too! Just take a look at the list above and add more activities!
It’s quite the workout to bend down so many times if you’re out of shape like me, but you’ll be moving quickly so there’s no time for a seat, ha! Just consider it your exercise for the day. Mine took me about 25 minutes and I had a pretty big space so it’s really not that bad. Just wear comfy clothing!
Step 3: play!
Wait! Make sure to take pictures/video before releasing kids! This will help you remember everything for the next time. Wait, there’s a next time? Believe me, kids will beg you to do this over and over again!
Or, you can also challenge them to create their own, while you relax and watch with a cold glass of lemonade (or in my case, coffee, even on the hottest day!).
Alternatives
No chalk or driveway space? No problem. You can get creative with any resources you have to create an indoor or outdoor obstacle course to get your kids moving!
Here are some ideas:
INDOOR OBSTACLE COURSE
- Jump over stuffed animals
- Throw crumpled paper in a basket
- Run around couch/table
- Crawl through a play tunnel
- Build a tower out of blocks/ cans/ boxes
- Jump criss-cross
- Hop on one foot while skip-counting
- Hi-5 (or hi-10?) the wall
- Wall push-ups, jumping jakcs, squats, etc.
- Act like a monkey/ dinosaur/ cat…
- Strike a pose
- Set up hurdles to jump over using cans with a pool noodle on top
OUTDOOR OBSTACLE COURSE
- Jump over stones or onto stepping stones
- Hop back and forth over a stretched-out hose
- Run around trees/benches/plants
- Hula hoop/ jump rope
- Ride a bike/ skateboard to the next station (we don’t have a big enough area for this, but in case you do…)
- Use any playground equipment you have: swing as high as you can, go down the slide 3 times, etc.
- Balance across a piece of wood on the grass
- Zip in and out of cones placed on the ground (or pots, buckets, etc.)
- Water plants
- Pull up weeds (I bet you’ll love these last two! Them, not so sure)
- Wash the car (am I getting carried away here?)
As a little incentive, place a snack at the last obstacle!
Here is an awesome obstacle course one of my students’ parents made using pool noodles!

Just be as creative as you can and use any resources you have to think of your own ideas, too! Don’t forget to enlist your kids’ help to come up with ideas. They are SO GOOD at that, as evidenced by the obstacle course of toys my daughter leaves me all over the house.
More Ways to get your kids moving!
I strongly believe that kids need to move to learn! You can incorporate movement into almost any lesson. Read the blog posts below for some ideas and also view my Body-Spelling Sight Words and Kinesthetic Alphabet resources for some movement fun!
Incorporating Movement into Sight Word Instruction
Teaching Different Learning Styles
Get inspired to create your own or to pass this information on to your students’ parents? Grab your freebie here and be sure to share this post to help other teachers out! I’d also LOVE to hear your feedback or ideas in the comments below!
Leave a Reply