I used to spend HOURS planning new literacy centers each week: making, laminating, cutting, sorting, labeling, differentiating. . . you know the drill!
SO. MUCH. WORK!
A few years ago, I started using 5 anchor centers almost every week. These literacy centers were perfect year-round because they provided students with choice while being easy to manage. All I had to do was switch one thing at each center and I was done.
I still changed my centers to add a new or seasonal activity, but I always knew I had 5 centers ready-to-go so there was no pressure to change them.
Anchor centers make your life so much easier in a few ways:
- Less planning time
- Less prepping time
- Less time going over center instructions
- More time with your small groups!
What are the Anchor Centers?
I’ll go over each one, explaining what we did and including management tips. At the bottom of this post, you will find the links to all freebies and resources mentioned.
Reading Center
At this center, kids would have free reading time in our library. They started by shopping for new books. Students brought their book baggies and went book-shopping and traded any books they wanted, then they could read those books, or a text from our library, and read in the book nook. They had the freedom to read alone or with a partner. Read more about book-shopping and our classroom library here.
In my library, I had:
- books by genre
- ‘Our class favorites’ basket
- class-made books
- Scholastic magazines (they especially loved opening up the big teacher copies and reading together)
- big books
- books with retelling pieces (stored in a bag)
- anchor charts, themed charts we labeled together, poem and sentence charts
- a basket of typed poems we read throughout the year


After reading and sometimes acting out with the retelling pieces, students got their center notebook and responded to their reading.
Reading Center Management:
It’s important to go over routines methodically or you end up with a huge mess in your library (and lots of fooling around). I had them place any books they no longer wanted to keep in their book baggies in a ‘Book Return’ bin before they added new ones.
They didn’t have to read books from their baggie at this center. They often chose other texts that didn’t go in their baggies, like Scholastic News magazines, poems, big books, etc. I modeled and we practiced taking ONE text and placing it back where it belonged. I also had a basket for books they forgot where to put back. At the beginning of the year, I have a grand opening of our library to introduce this center. Click the image to read more about it!

Kids love this center because of the freedom they have. However, it can easily go haywire and turn into a play center if you let it. I let my students know if they were not treating this center the way it was supposed to be treated, they would be removed from the center.
At times, I’ve also had to “shut down” the center for books not being placed where they needed to go. My students were 5 and 6 so I understood it could be hard to remember where they got a book from. However, since I had the return basket where they could place books they were unsure of, there was no excuse for books on the floor. I simply used a different center the following week and reopened the reading center after that (after a conversation of treating it right and reviewing routines, of course).
Sharing reading response notebooks at the end of center time was an incentive for them to try their best, too. I displayed this poster to help them get started if they needed help.

Writing Center
I love the writing center! It’s so easy to differentiate because everyone writes according to their ability. At the beginning of the year, I showed my students how to do the following two writing activities and I always had them at this center.
Activity 1- Labeling and Sentence Writing: In kindergarten and 1st grade, there is just such a wide range of writing ability as I’m sure you know. Some kids are writing a scribble, some are random letters, others beginning sounds, some record many sounds, while others are writing complete sentences.
Because of this huge range, I did a lot of labeling activities! You can have kids label laminated pictures, Scholastic News, or a picture they made with stamps!

It took time to get new resources for labeling each week, so I made labeling pages with year-round themes. Here is the link to them on TpT: Labeling Bundle
Instead of adding arrows or lines to dictate which items to label, kids got to choose what they wanted to label! My students loved challenging themselves to label more and more things on the page.
I also included lines at the bottom for those who were ready for sentence-writing. I have them for every theme and season, so I just replaced the sheet weekly and students were able to label according to their writing ability.

We practiced stretching out words and at times also did these as morning work or a whole-group or individual quick warm-up to our writing block. Read more about how I teach stretching out words to label here: Stretching Out Words: Emergent Writing Strategy.
I also used these on the ENO board and had students come up to write right on the board.

Activity 2- Build it and Write: If there ever was an activity kids begged to do, it was this one. Even my most reluctant writers loved to cut and paste their pictures before writing!
I love that these are differentiated (one version has a picture word bank and sentence prompt), and kids can add as much detail to the words and pictures as they want (I include lined paper to copy double-sided). Again, I have these for the whole year so I just replaced the sheet each week.

These are available in my Tejeda’s Tots Shop here and in my TpT store here.
Other Writing: I also aligned my writing center with the genre in our Writer’s Workshop. At the beginning of the year, when writing narratives, I placed narrative books of different levels at this center, along with mini-books for them to write in, and writing tools including editing and revising checklists. Towards the end of the year, I included different writing paper and booklets so they could choose any genre to write in. This center requires a bit more support, so I often had my teaching assistant work to help this group.
Word Work Center
Sorting is always an effective way to practice word study! I used my word work sorts frequently and loved how they were easy to differentiate for each group. All I did was copy the word sort for each group and place it in that group’s drawer. Students glued the headings into their notebooks first, then cut and pasted each picture into the corresponding column, and labeled them or completed the words.
As a bonus, I challenged them to think of a few more words for each category.

You can grab a free sample of my word sorts from my Free Resource Library.
At this center, I also often had a “Read the Room” activity where kids got to walk around with a clipboard, reading and writing words around the room. Often, they “marked up” the words they wrote, to identify the phonics skill.
Word Work Center Management
- As with all of my centers, I did this whole-group a few times at the beginning of the year to ensure students knew exactly what to do.
- Teach students to cut out one picture at a time, so they don’t lose their pieces.
- If time ran out before they finished (if they were with me for guided reading, they may not have had enough time), they simply tucked the remaining pictures into their notebook and finished it before working on the new sort next time.
- To extend learning, you can have students use some of the words in sentences.
- When doing “Read the Room,” set ground rules and consequences for breaking them.
Sight Words Center
This is one of the students’ favorite centers! I have a TON of sight word games so I did switch this one often, but you don’t NEED to have fancy resources! All I suggest is to have something that includes the sight words in context so kids know what words they are working with, and materials for hands-on practice!
Over the years, these have become our favorites and we used them almost every week.
Roll & Do- FREE in my TpT store! Such an easy center to change from week to week- just switch the word cards. Kids got their notebooks and took turns rolling the dice and doing what it said.

One die had their sight words and the other had activities- from “writing” the word on the table with their finger, to rainbow-writing in their notebook, building with play-doh, magnetic letters and more.
You can choose which cards to use in the die depending on the materials you have.
We also used this graph often, but this is not included in the freebie. You’ll find the editable graph template in the bundle of sight word games here: Sight Word Pocket Dice Center Games

Sight Word Mats- these hands-on mats are perfect for your students to work on individually when they have a hard time working quietly or cooperatively in groups :). The mats include the sight words in sentences so kids read the word in context and know which word they are working on. After reading and writing the word, kids built it using different materials I had in the center. I had these laminated, but sometimes I printed in black & white and used them whole-group when I introduced the sight words. Kids had their own play-doh tubs to build the word at the bottom.

Sight Word Fluency Flashcards- When students finished Roll & Do or the mats, they could practice their fluency flashcards. Each child had a sight word ring on their level to take home and I made enough to have a set of each at my sight word center. They knew which color to practice and loved using wikki sticks to find and circle the word.

Sight Words Center Management
Did you ever ask a student what word they are building and they couldn’t answer you?
Too often, kids just go through the motion of building words when they can’t read the word and have no idea what it is! Like I mentioned at the beginning of this section, you can use from a million sight word activities, but make sure you have the words in context so the kids can read them and know what they mean.
Whatever the sight word center activity, I made sure to include my 2-sided sight word sentence cards with the words each group was using. Kids knew they had to first find the sentence card and read it to know the word they were working with. If I went over and asked them what word they were practicing, I expected them to tell me.

To differentiate the words for different groups, I used a 3-drawer storage unit. First, I color-coded the drawers so each group knew where to get their word cards. Then, I placed the 2-sided sentence cards, mats, and fluency flashcards in each drawer. Finally, I had a caddy with materials I placed on top of the storage unit (and trays with magnetic letters). Read more about differentiating sight word instruction here: Differentiating Sight Word Instruction.

Switch your materials from time to time to keep it engaging. Some ideas: play-doh, pipe cleaners, cubes, wikki sticks, small counters, stamps, magnetic letters, pompoms, mini-erasers.
The materials bin can get messy so, as with any center, let kids know that you will have to shut down the center if they don’t treat it properly and clean up after themselves.
Listening Center
I kept book copies in a bin and labeled my CD player so kids knew which buttons to press. I had different options for students’ responses:
- Response sheet- I sometimes had a response sheet to go with the book (or a generic one that could be used with most books, and kids just wrote the title in).
- Student notebook- my kids had 1 notebook that they worked in for everything (except guided reading; I kept those). This just made it easy to find, grab, and check. They wrote the title on the next blank page and responded any way they wanted unless I had a specific prompt.
- Puppet Show- I also invited my kindergartners to create puppets (popsicle sticks and construction paper) and act out the story.

Listening Centers Management
To avoid fighting over who gets to press the buttons, hire a center leader for the week! This leader pressed the CD buttons (I taught them all how to do this), passed out papers and materials at centers when necessary, and was the only person allowed to interrupt me if no one at the center could answer a question they had.
Poetry Center
If you’ve been keeping track, this is actually center #6- bonus one! I sometimes combined this center with the word work or sight word center, since our poem often had the sight words or skill we were learning about. When I had a craft or other activity to do with the poem, I kept it as a separate center, replacing one of my other centers.
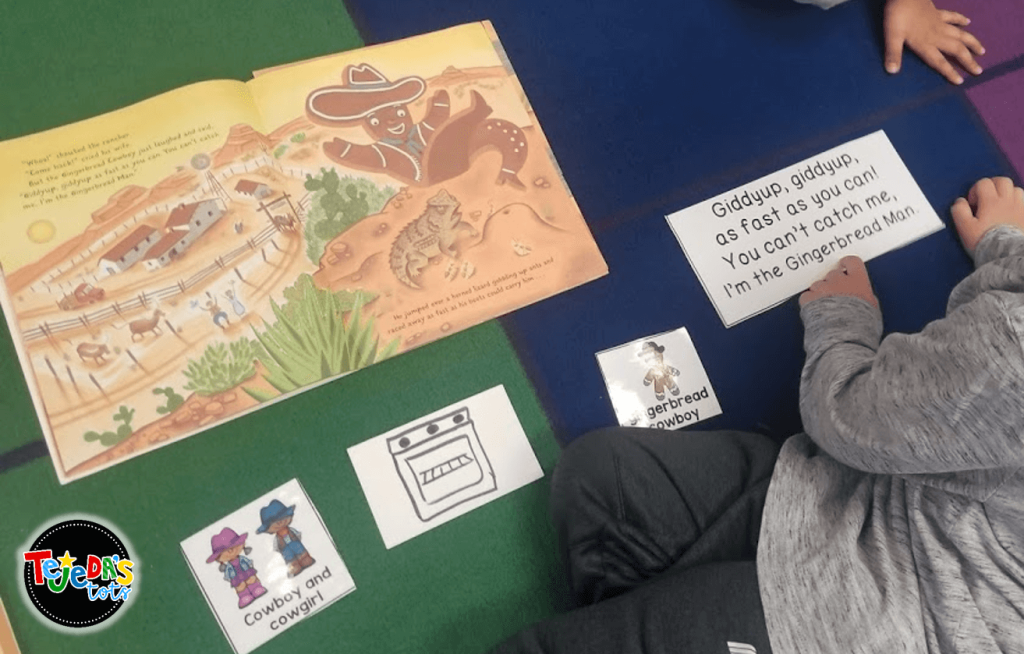
At this center, students read our poem on chart paper, mixed and fixed sentence strips or word cards on a pocket chart, then glued a small copy into their notebooks. They read it 3 times, highlighted words or word features, and illustrated the poem.

I also kept a bin of previously learned poems I typed up and laminated. They could practice reading these for fluency or reread poems they had in their notebooks.
Poetry Center Management
It took years for me to have my poems typed up and I’m not sure I was ever caught up because we always added new poems each year! SO, don’t feel like you need to be up to date with all your poems. That’s overwhelming! Kids love to reread familiar poems so when you have a few poems in the bucket, it’s enough to keep them engaged.
Laminate the typed poems and put dry-erase markers or wikki sticks for kids to find and highlight word features or sight words.
Keep your big charted poems on hooks (I used plastic Command hooks I attached to a cabinet door). Punch holes after laminating the chart paper (not too close to the top so they don’t rip easily).
When you have accumulated a lot of poems, to keep them from falling off and to keep them fresh, rotate the poems! Just store the ones you don’t use and replace them from time to time.
To keep your sentence strips together with the poem, make a little pocket on the back of your poem by folding up the bottom of your chart! Staple the sides and use a binder clip to keep the pieces inside.
Including pointers makes this center even more fun!

OTHER Literacy CENTERS
Of course, I also threw in other literacy centers from time to time, like Read the Room, a special game or craft, and even math or science centers. But, these evergreen anchor centers really helped save me time and relieved the pressure of finding something new each week.
Center Management Notes
I think it’s important to provide choice to students at center time! It increases engagement, improves behavior, and kids are more invested in doing a great job when they get to pick the activities.
As you can see, I provided a few activities at each center, while keeping them easy to manage by only having to switch out one element- words, sheet, cards, or nothing at all (reading center).
My students stayed at the same table the entire 45 minutes of our centers/ guided reading block. Some teachers like to have their kids rotate through different centers, but that just never worked for me. It took too much time, was distracting, and I felt rushed to get through a guided reading group in time to monitor rotations.
However, the students did have enough activities to work on at their center and they were hands-on, kids worked cooperatively, and they always had something to do when they finished their centers. Centers was their favorite time of the day because they felt like they were playing!
To Summarize:
- Keep it simple! You don’t need to get any fancy resources, but over the years, I’ve added some that have become favorites, so I wanted to include those options here for you.
- Have 5 anchor centers- just switch out 1 element weekly
- Writing: label anything!
- Sight words: something so they have the words in context and are able to read them, then materials for hands-on practice.
- Reading: your library! Along with some ground rules and a variety of texts and reading material (and student notebooks), you don’t need to prep anything for this center.
- Word Study/Work: picture word sorts to go with your phonics skill, Read the Room is always a hit.
- Listening– books on CD, optional response sheets, materials for making stick puppets.
- **Poetry– can be combined with Sight Words or Writing center
- Setting rules, teaching routines, and reviewing them when necessary is key to having smooth-running literacy centers!
Here are the links to the resources mentioned in this post:
- FREE Sight word Roll & Do
- FREE Word Work Sorts (2 samples)
- Sight Words Pocket Dice Games
- Labeling Pages
- Build and Write
- Sight Word Mats
- Sight Word Fluency Flashcards
- Sight Word Sentence Cards
- Word Sorts Notebook
You can also find them all in my Tejeda’s Tots Shop here.
Feel free to comment below with your favorites or any questions you have about literacy centers! I’d love it if you shared on Pinterest so more teachers can also read about these centers!

Leave a Reply